About Me

My photo
A food technologist by education, techno- commercial by profession and a foody at heart. Discovering and appreciating good food is my habit and experimenting with various flavors, and cooking techniques my passion! Food styling is my hobby and eating a favourite! Why this blog name? Because I always look for the green dot, because I am a vegetarian - no egg,no gelatin! I believe that you can find good food anywhere, sometimes at the places you least expect!I also believe that food is meant to be shared and its okay when you offer somebody your favourite food and secretly wish that he refuses so that you can have it all by yourself!Good food is omnipresent! You need to have the nose for it :)

Translate

Tuesday, November 24, 2015

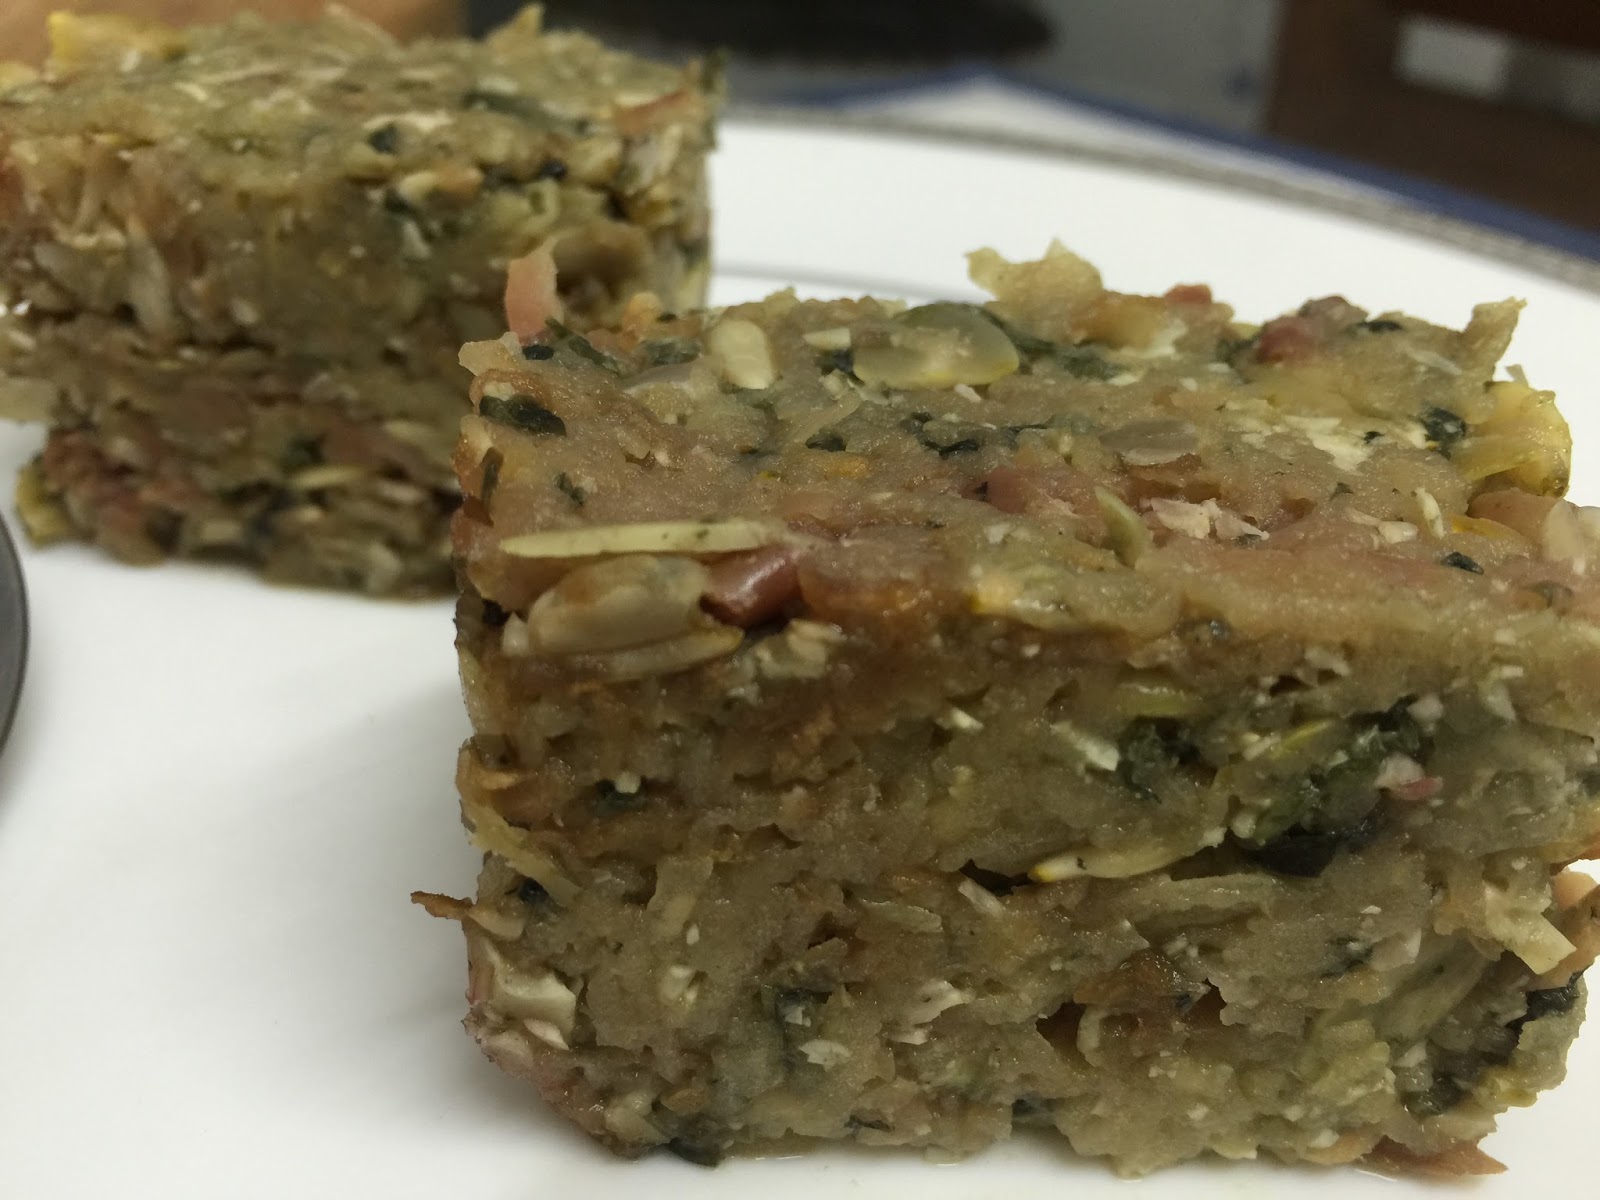
Apple Cake!

Who said healthy can't be yummy!
Ummmm....I myself used to think so until I created this.


It is sooooperr healthy, super filling and good to keep you going till your next meal!

Ingredients:
Pumpkin Seeds 20g
Sunflower Seeds 15g
Apple 1 
Instructions:
1.Wash and soak the seeds overnight.
2.Grind the seeds with a little water  in pestle and mortar next morning.
3. Mix it with grated apple.
4.Spread it in a cake tin and bake in a preheated oven for 20 minutes at 200 degree Celsius.
5.Mix it while still hot and with the help of a mould, plate it on a platter.
6.Sprinkle some freshly ground cinnamon.
Enjoy while still warm!

Friday, September 18, 2015

Two beauties to whistle at!

 A raspberry pinkKitchenaid Diamond Mixer and an apple candy Kitchenaid Fully Automatic Toaster became part of our family on the evening of 16th September 2015. The Mercedes of Kitchen gadgets as I call them, they are indeed beauties to whistle at!

   Being a food scientist, I could understand the versatility of the Kitchenaid Diamond Blender but was just waiting for the right time to procure it ( read -the moment the heirloom Usha Mixie conks off!).Now,there are some people who review, test run and re run things infinite number of times before closing the purchase decision and then there are people who are crystal clear in their mind about what they want. They go into the store pick up what they want and skate straight to the payment counter. The latter one being at the verge of extinction, I am perched at the cusp of the two types and do my online research and head straight to the payment counter, leaving the entire sales staff gaping and commenting 'Ma'am it is for the first time that we have sold these two things together at one go in under 30minutes" Satiated by the compliment I secretly blushed and smiled. My partner in crime (read my husband- Mudit ) acknowledging (but not validating) my sense of urgency, took over to settle the billing part while I meandered through the aisles to pick up some bread, mustard and cheese to dole out sandwiches for dinner. End of the sales process marked the beginning of a new era in our lives as we both wanted to hire a helicopter to reach home and plug in the beauties.
 It is embarrassing even to admit that I had the excitement  of a five year old and finished reading the user manual under my cellphone's torchlight much before we reached home. Enroute I conjured up various recipes to try. Paneer bhurji sandwich...aloo sandwich?No...I need to try both my toaster and blender...Cheese Sandwich? No...it won't be filling as a stand alone.Rejecting several mental recipes I concluded making a paneer Tikka Sandwich.I quickly ordered a 'Paneer tikka' and it greeted me as I unlocked my home.
I put my handbag on to the couch, washed my hands and the mixer and emptied the entire contents of the paneer tikka into the jar along with the accompanying chutney and used the hot food function followed by chopping speed and was left with a creamy pasty spread ready to marry a piece of bread. My studio was already full of tandoori notes and my stomach began questioning my mouth for the delay. To water down the fight, I quickly buttered the sides of the bread and sandwiched the tikka paste, pressed into the sandwich maker and put it into the Kitchenaid toaster at level 4. Whoa! greeted the beauty in couple of minutes emerging out slowly carrying my perfectly browned Paneer Tikka Sandwich!
It was indeed a marriage made in heaven. We both gorged on the sandwiches and discussed what next is to be tried for breakfast!
Fully satisfied by the meal and my gadgets, I can't wait to try some long thought recipes!

Thursday, July 9, 2015

Arugula-Alfa alfa salad

Ingredients:

1. Alfa Alfa Sprouts: 1/2 cup
2. Arugula: 2 handful
3. Tofu (Crumbled): 1/4 cup
4. Raisins (Soaked): 15no.
5. Mustard Sauce: 1t
6. Peach- Apricot crush: 1t
7.Salt: To taste


Method:

1. Mix together the sprouts and arugula.
2. Whisk together the fruit crush and  mustard sauce; dilute with a little water if desired.
3.Dress the sprouts and arugula with this dressing.
4. Top it with crumbled tofu and raisins.

Tuesday, April 22, 2014

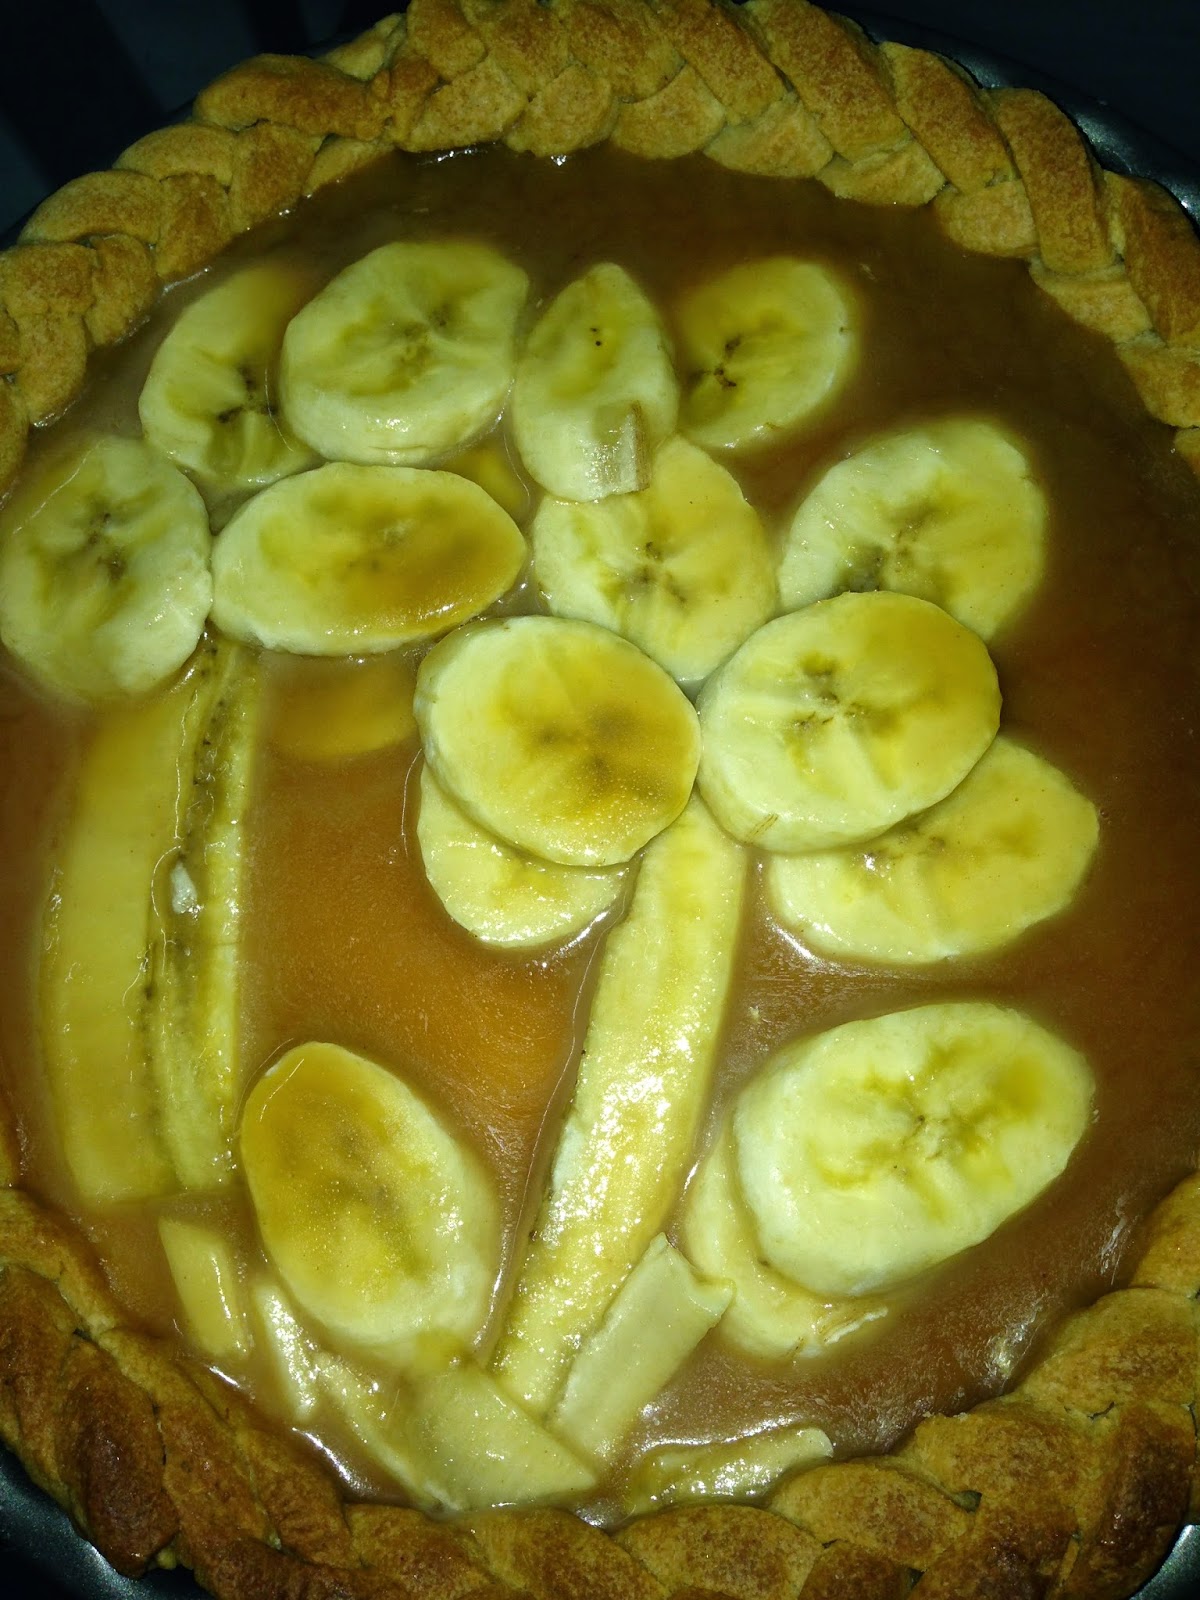
Banofie pie

It was yet another potluck at a close friend's house. The dessert was on us. Two cakes were already being ordered, so another cake was out of question.
I was already wondering what to take to feed the crowd (read 23 people). Several ideas crossed my mind panacotta,pudding, cheesecake....Somehow none of the ideas interested Mudit! I ended up making this banofie pie which was polished in minutes!
Here goes the recipe.


Ingredients:

Maida: 1.5 cup
Butter : 100gm
Custard Powder( Vanilla): 100gms
Milk (Full cream) : 1l
Sugar: 4 T
Banana ( Ripe and firm ) : 2

Tofffe sauce:

Butter 1T
Sugar : 4T
Water: 5T


Procedure:

1 Rub together butter and flour.
2 Knead a stiff but pliable dough with very little water.
3 Roll a flat disk of size an inch bigger than the pie dish.
4 Place the disk over the dish and gently push it across the walls of the dish so that it mirrors the dish.
5 Place pie beans/ kidney beans and place in a preheated oven and bake for 45 minutes or until light golden in colour.
6 Remove from pan and let it cool on a wire rack.
7 Heat milk in a heavy bottom pan.
8 Mix the custard powder in cold milk and slowly add it to the hot milk while stirring continuously.
9 Heat the custard to the point when the base of the pan is clearly visible while stirring.
10. Add sugar and stir.
11. Pour hot custard in to the pie and leave it undisturbed for a couple of hours to set. Refrigerate once set.
12 Melt together sugar and butter and heat until it becomes amber coloured. Add water and stir constantly .
13 Arrange banana slices over the custard and pour the toffee sauce over it.
14. Refrigerate for a couple of hours and and serve chilled.

PS: The ratio of flour and butter would vary based on how large the pie dish is. However, the rule of thumb is that it has to be very crumbly but when held in a fist, it shouldn't fall apart.
Also, the amount of sugar is a matter of personal preferance but however keep in mind the fact that you will add banana and toffee sauce so it should overall balance.

Tuesday, March 25, 2014

Rocket-Mushroom salad

Ingredients:
Mushrooms: 2cups
Arugula : A good handful
Garlic(Minced) : 2t
Lemon Juice: 2t
Parsley(Minced): 2t
Kidney Beans (Boiled): 1/2 cup
Cracked Black Pepper: To taste
Salt: To taste
Olive oil: 2t

Method:

1.Heat oil in a skillet and roast garlic until fragrant.
2. Add Mushrooms and cook till fragrant.
3. Add salt and pepper.
4. Toss the boiled kidney beans to it.
This recipe is a make ahead till this step.
 5. Add arugula leaves, parsley and lemon juice, just before serving.

PS:: It was yum! Even a fussy eater like me
couldn't resist a second helping :) 

Sunday, December 15, 2013

Hot Coconut pudding over pineapple rings

This happens with me sometimes that I pick up few ingredients while my grocery shopping, not knowing what am I going to make of them :D
This pretty was invented, when I had a connoisseur over dinner with absolutely no notice!
The dessert was a an absolute show winner.
This is so simple yet so comforting with creamy notes of coconut mingling with fresh tangy notes of pineapple.
Here's how.


Ingredients:
1. Coconut Milk : 2 tetrapacks ( I used Dabur)
2. Full cream milk : 200ml
3. Rice: 1/4 cup
4. Pineapple slices 
5. Sugar: To taste

Method:

1 In a heavy bottom pan bring together to boil milk and coconut milk.
2 Add rice and cook on medium fire until rice is cooked and the liquid evaporates leaving behind thick  
   sticky mass.
3 Add sugar to taste.
4. Place a pineapple ring on the platter and spoon out hot pudding over it.


Monday, July 29, 2013

Blueberry duffins

Blueberry duffins! 
Yep it's a blueberry muffin in the shape of doughnut 
Ingredients :
Maida : 1 cup
Baking soda: 1/2 t
Baking powder : 1 t
Milkmaid 1/3tin
Blueberry sauce: 3T
Butter: 50g
Method:
Blueberry sauce : Mix one cup frozen blueberries with 1/2 cup sugar and crush in a processor carefully so as not to purée it fully. Let it stay chunky.Heat in a heavy bottom pan with one cup water till it reaches a syrupy consistency.Let it cool.
Duffin:
1. Sift maida, baking powder and baking soda thrice 
2. Melt butter, add 50 ml water, milkmaid and blueberry sauce
3 Fold in the dry ingredients
4 Transfer to pre greased doughnut shaped muffin tins.
5 Bake in a preheated oven for 20 minutes
6 Serve warm with blueberry sauce on the side
Posted by Picasa

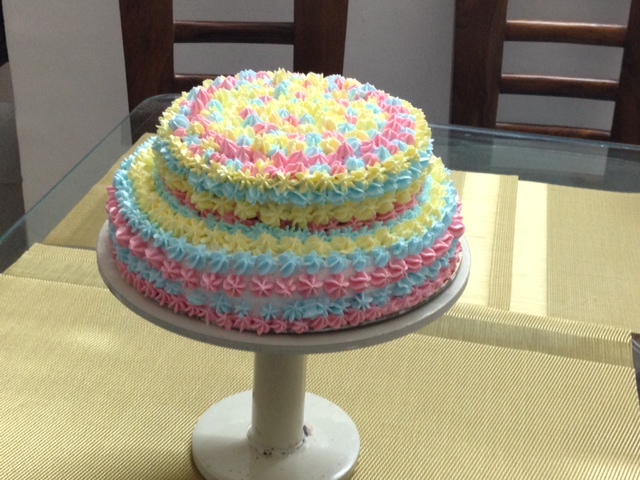
Tier cake - for hubbies buddies reunion!

My husband Mudit was very excited and was looking forward to meet his school buddies after almost 17 long years.The reunion had its own charm, it was like a time machine to their childhood days, and they sat there all afternoon reminiscing the good old days. Although many of them were in touch with each other , but meeting all of them together, with their respective families was captivating.
Over the past couple of weeks I discovered a new person in my spouse- he was bursting full of energy- at home, at work and elsewhere.I could see a child like enthusiasm in his eyes and cheer filled in his voice. He had the vigor of  a five year old who is too excited to bring his new friends home to meet his parents and to tell the world that he has the best bunch of buddies! (He indeed is blessed to have such a wonderful group of friends!) I decided to be a part of his enthusiasm and contribute my own little bit by baking a cake :)
We were expecting a gathering of around 30 adults and 12 kids. Tier cake was the only solution to feed around 40 people. I started with 2 basic sponge cakes and what happened next is below!


Ingredients:

For 2 pound chocolate sponge

Milkmaid: 1cup
Maida    : 1cup
Cocoa Powder: 1/4 cup
Baking soda :1/2t
Baking Powder :1t
Drinking Soda : 1/2 cup
Vanilla Essence : 1t
Sugar : 2 T
Oil : 1/2 cup

For 1 pound chocolate sponge


Milkmaid: 1/2cup
Maida    : 1/2cup
Cocoa Powder: 1/8 cup
Baking soda :1/4t
Baking Powder :1/2t
Drinking Soda : 1/4cup
Vanilla Essence : 1/2t
Sugar : 1 T
Oil : 1/4cup

Whipping cream : 2cups
Natural food colours: Few drops

Method:

1. Whisk milkmaid with an electric whisker for 5 minutes at constant high speed  
2. Slowly add oil and keep whisking
3. Sift together baking powder, sugar, maida, baking soda and cocoa powder.
4. Alternatively add drinking soda and flour mix, with continuous whisking.
5. Add vanilla essence.
6. Pour in a greased cake tin and bake in a preheated oven at 180 degrees for 30 minutes or until a skewer comes out clean


7. Demould and let it cool on a wire rack.
8.Make both the sponges with same process.
9. Refrigerate overnight or for few hours.
10. Slice the cake horizontally in two slices and even out all humps and crumbs with the help of a sharp knife.
11. Place the first slice of cake on a turn table.
12. Whip the cream until stiff peaks are formed.

13. Put a dollop on the cake slice and even out with the help of an icing knife.
14. Sandwich it with the other slice of cake and cover all sides with whip cream.

15. Repeat the same with the smaller sponge too.
16. Insert 3 toothpicks carefully in the bigger sponge and secure the second cake over it.

17. Divide the whipped cream in 3 parts and add different colours to each of them.
18. Fill up some cream in the piping bag and using the tip 7, nicely cover the entire cake..
19. Refrigerate the cake.

Wednesday, July 24, 2013

Our Anniversary cake!

It was our 6th Wedding anniversary and I was itching to bake a cake. All these years I had been thinking of baking one, but was too fainthearted to take the 'risk' of a spoilt mood by a flop cake! This year I gird up my loins and ventured into cake making. I started  with basic eggless sponge cake and then let my creative juices flow.Originally the plan was to decorate the cake with glazed exotic berries, I had even procured a tin of ' summer berries in light syrup' and thought of glazing and placing them on top of the cake. I pop opened the can and was shattered to see the faded, dull, limpy berries- brown raspberries, grey strawberries and ugly blueberries.It was then that I decided to decorate with roasted almond flakes. The results are in front of you!
Here's the recipe:

Ingredients:

Milkmaid: 1cup
Maida    : 1cup
Cocoa Powder: 1/4 cup
Baking soda :1/2t
Baking Powder :1t
Drinking Soda : 1/2 cup
Vanilla Essence : 1t
Sugar : 2 T
Oil : 1/2 cup

Whipping cream : 1cup
Almond flakes 100gms
Cooking chocolate : 200gms
Orange zest 1T
Wafers : 1 pack

Method:

1. Whisk milkmaid with an electric whisker for 5 minutes at constant high speed
2. Slowly add oil and keep whisking
3. Sift together baking powder, sugar, maida, baking soda and cocoa powder.
4. Alternatively add drinking soda and flour mix, with continuous whisking.
5. Add vanilla essence.
6. Pour in a greased cake tin and bake in a preheated oven at 180degrees for 30 minutes or until a skewer comes out clean
7. Demould and let it cool on a wire rack.
8. Refrigerate overnight or for few hours.
9. Slice the cake horizontally in two slices and even out all humps and crumbs with the help of a sharp knife.
10. Place the first slice of cake on a turn table.
11. Whip the cream until stiff peaks are formed.
12. Put a dollop on the cake slice and even out with the help of an icing knife.
13. Sandwich it with the other slice of cake and cover all sides with whip cream.
14. Fill up some cream in the piping bag and nicely cover the edges of the cake with vertical lines.
15. Refrigerate the cake.
16. In a double boiler, temper some chocolate and add the zest of orange.
17. Dip the wafers in the molten chocolate and place them on a parchment paper and refrigerate till the coating is hard.
18. Align the choco sticks on the edges of the cake.
19. Top the cake with roasted almond flakes.
20. Enjoy!


Saturday, July 20, 2013

Double Choco Chip Cookies.

"The mausam was  awesome and my oven was craving for some cookies.I had no option but to bake"..
Here's the recipe...


Ingredients

Maida : 1 cup
Baking powder : 1/2 t
Baking soda :1/4 t
Sugar: 4 T
Butter : 30gms
Choco chips : 2/3 cup
Milk : 2 T

Method:

1. Sift together maida, bpd, b soda


2. Cream together sugar and butter with a whisk.


3. Mix both things together and knead into a dough adding milk.


4. Add the choco chips


5. Portion the dough into 6 parts
6. Arrange and flatten on a lined baking tray.
7. Bake in a preheated oven at 180 degrees for 30 minutes or until they turn nice golden brown..

Friday, July 19, 2013

Vegan Fondant

Vegan Fondant


The main reason why most other home-made fondant recipes cannot be considered vegan is because they contain gelatin or marshmallows as thickeners. One vegan alternative is agar agar.

Ingredients

* 3/4 tsp agar agar powder
* 1/8 cup cold water
* 1/4 cup liquid glucose
* 1 tbsp vegetable shortening
* 1/2 tablespoon glycerin
* a little more than 2 cups icing
* 1 tsp vanilla extract or other flavoring

Directions

1. Start by sifting the icing sugar into a bowl through a large metal strainer. You can see how all the big lumps are broken up and the icing sugar is nice and airy. This will make kneading later on easier and you will avoid having icing sugar lumps in the fondant.
2 Mix the agar powder with water in a small saucepan and let it soak for a while. It will become of a thicker, gelatinous consistency. After about 10 minutes place the saucepan on the stove top on low heat. The goal is to dissolve the agar mixture. This has to be done slowly. (Otherwise the water will simply evaporate and agar speckles are left in the bottom of the pan.) Stir constantly and add more water by the tablespoon as needed so the mixture doesn't dry out.When you see that all the agar powder is dissolved (it will take probably around 10 minutes) take the pan from the heat.
3 Now, add the glucose/corn syrup and shortening. Stir the mixture until all of the shortening dissolves. Stir in glycerin and flavoring.
4.Put half of the sifted icing sugar into another bowl. Make a well and pour in the agar mixture. Stir together with a spatula as much as possible adding more icing sugar when needed. When you can't stir anymore start kneading in the icing sugar as needed by hand. 5 Form the fondant into a ball.
6. Portion into 4 parts and knead in the desired colours.
7. This fondant can be used in various ways to decorate.I had some muffins in hand, so practiced on that.

PS:Will upload step by step tutorial soon :)

Tuesday, July 16, 2013

Banana Walnut slice

Baking is now my latest obsession-it has started growing on me! You wont believe me if I tell you that I am literally thinking about baking 24X7.
This morning when my spouse caught me baking at the wee hours of morning, he was taken aback!
My urge to bake was simply irresistible and I started as early as 5 am!
I baked a banana walnut loaf today, very healthy, very yummy!
Here is the recipe:


This is how it looked, I didn't have a loaf tin so had to manage with a cake tin... 

I thought of clicking pics for every step but was too impatient!


INGREDIENTS:

1. Whole wheat flour : 1.5 cup
2. Ripe Bananas : 3
3. Milk: 1cup
4. Maple/ Golden syrup / honey :2T
5. Chopped walnuts : 1/2 cup
6. Refined oil : 1/2cup
7. Salt: 1/2t
8. Baking soda: 1t
9. Baking Powder : 2t
10. Omega Mix :1T

METHOD:

1. Mix all the dry ingredients (except the walnuts and omega mix )and sift through thrice.
2. Blend and whisk all wet ingredients.
3. Mix the two by cut and fold method, being careful of not over mixing.
4. Fold in the omega mix and chopped walnuts
5. Transfer to a greased mold and bake in a preheated oven for 30 minutes until a toothpick comes out  clean.
6. Demould. Let it cool on a wire rack and cut into thick slices. Serve hot or at room temperature.

PS: This has just the right amount of sweetness for adults. However,if serving to  kids , sandwich some nutella between the two slices.

Thursday, July 11, 2013

Tabbouleh

I have had very limited exposure to the Arabic cuisine. I somehow happened to taste this salad during my visit to Dubai; and today decided to replicate it in my kitchen! This is a very healthy and fresh salad and is predominated by fresh parsley notes. It can be heaped on a pita bread or can be served as a side and for small eaters, this can be a meal in itself.

                                                                                                  INGREDIENTS


  • Couscous : 1cup
  • Bell pepper( finely chopped): 1
  • Tomatoes (finely chopped) :2
  • Onion ( finely chopped) :1
  • Black olive (sliced) : 3T
  • Olive oil 2T
  • Lime juice 2T
  • Parsley (finely chopped): 2T
  • Mint leaves (finely chopped) : 1T
  • Salt : To taste
PROCEDURE

1 Bring 1 cup water to boil along with some salt and 1t salt
2 Remove from flame and sprinkle couscous, delicately stirring it.
3 Cover the lid and let it rest for 2-3 minutes
4 Fluff up with a fork and add chopped tomatoes,bell peppers, onions and olives.
5 In a bowl or dressing shaker, whisk the olive oil, lime jiuce, herbs and salt.
6 Mix the dressing into the salad.
7 Cover with lid and stotre in the refrigerator for couple of hours to help the flavours blend in.
8 Serve cold with warm pita bread.


Wednesday, June 26, 2013

The basic rawa idli

Well, for all those years I had been dreading making idlis or dhoklas for the simple reason that they would not come out fluffy and will be sheer waste of time and effort.
However, last weekend I gorged on around 12 idlis made by one of my very dear friend Nikita.
The ease with which she was rolling out those fluffy idlis left me gaping awe stricken! Believe me it was just irresistible for me to stop at two, three, five, seven......She intended to fry the idlis with onion and capsicum but I was too impatient for that!
I tried the basic idli this morning which came out ' oh so nicely!'
I am going to experiment a LOT with this basic idli and this can be imputed to my newly found LOVE for them!
Here's the recipe, and believe me you just cant go wrong with this!


INGREDIENTS:

Semolina (Sooji) : 1cup
Sour curd           :  1cup
Water                 :  1/3 cup
Fruit salt (unflavoured eno) : 1t
Oil                      :  1t


PROCEDURE:

1. Mix semolina, curd , oil and water into a very smooth batter.
2. You may whisk it with an electronic whisker
3 Let it stand for 14-20 minutes
4 Add the fruit salt and give it a gentle mix. Remember not to overmix it.
5 Fill 1/3 of moulds and place in the steamer.
6 Microwave for 5 minutes.
7 Wait a while before you demould them.
8 Serve while still hot.

PS : Do not let the batter sit for long after you have mixed with eno.
If you have an idli stand, pour some water in a pressure cooker and bring it to boil before you place the batter filled idli stand. Remove the weight, cook on high heat for 3 minutes and medium for 9 minutes.
Check with a skewer, 'cooked' means the skewer comes out clean. Do not cook on high flame for a long time, if you want the idlis to be fluffy.

Tuesday, June 25, 2013

Tapenade


INGREDIENTS

  •  Black Pitted/Sliced Olives - 1 cup
  •  Extra Virgin Olive Oil - ½ cup
  • Capers - 2 T
  • Garlic, crushed - 2T
  • Fresh Basil or Parsley, chopped -1 T
  • Freshly Squeezed Lemon Juice - 1 T
  • Lemon Zest - ½ t
  • Cracked Black Pepper - ½ t
  • Salt - ½ t


Method
  1. Blend all ingredients in a blender/pestle and mortar to combine until mixture becomes a coarse paste.
This can be served  as a spread on bread or crackers. Tapenade & slices of mozzarella cheese in wholewheat bread will make a hearty & delicious sandwich.

Friday, June 7, 2013

Lichi Icecream


Ingredients:

Lychee : 1.5kg
Milk : 1kg
Condensed milk: 1/2 tin
Corn flour: 2T


Procedure:

1. Peel all the lychees.
2. Remove all stones, carefully securing all juice that drips.


3 Puree half the lychees and tear the rest.
4 In a heavy bottomed pan, boil milk and reduce to half
5 Add condensed milk  and cook for 5 minutes.
6 Dissolve cornflour in cold milk and slowly add to above mixture.
7 Cook till you achieve, 'coat a spoon' consistency.
8 Pour in aluminium vessel, cover with foil and freeze.
9 Churn the mixture with a whipper when the freezing sets in.

10 Repeat above step 2-3 times.
11. Add the pureed lychee and the lychee chunks.
12 Let it freeze.
13. Serve chilled

PS:: Instead of 1.5kg buy 2kg lychees, you will end up eating half a kilo while peeling!
Now this is sheer experience.


Tuesday, June 4, 2013

Melon-Mint salad


The salad truly brings out the flavours of summer with its melony - minty notes.


INGREDIENTS

Water Melon : 1 big bowl (sliced and deseeded)
Mixed Leaves: 8-10 nos
Ginger : thinly sliced (8-10 nos)
Ginger juice 1t
Fresh mint leaves: 1small bunch
Hazelnut : 8-10 nos.
Sugar: 1T
Extra Virgin Olive oil : 1T
Lime Juice: 2T
Cracked Black Pepper: 1t
Salt: To taste


PROCEDURE

1 Place the watermelon slices in the freezer to ensure they are super chilled.
 2 In a deep bowl take some chilled water and ice, and soak the leaves. This is called 'shocking' and will ensure crunchiness in the leaves.
3. In a heavy bottomed pan, melt the sugar and caramelize it a little bit. Dip the ginger slices in this caramel and quickly float it in iced water. Remove and let it dry.
4. Add some water to any caramel left in the pan and dissolve properly. Mix it with ginger juice.
5. In a dressing shaker, pour in the above liquid, olive oil, lime juice, salt, pepper and finely minced mint leaves. Shake well.
6. In a salad dish, make a bed of the crunchy leaves and arrange chilled melon slices on top.
7.Pour in the dressing liberally.
8 Top it with candied ginger and hazelnuts.

PS: Hazelnuts can be here easily substituted by some nuts such as almonds or walnuts.


Friday, May 17, 2013


We
We wanted to have Italian during our visit to the Ambience mall in vasant kunj. We were heading towards Amici ( you cant go wrong with their Al funghi ) when we stumbled upon this gem at the mall’s entrance.
It was a weekday and the restaurant was relatively vacant. Impressed by the very European interiors, we couldn’t afford to give this place a miss.
This restaurant is spread over two floors with huge seating options.. 
At the ground floor, the seating is planned in a way that you feel a part of the buzz in the mall. We were however recommended seat on the first level..
The first level had a nice view of the mall and you could watch people through the glass while indulging in food.
The ambience was nice, the AC- super cool and music comfortably soft.
What caught my attention were the knives placed on the table. The restaurant was considerate enough to place real knives instead of the blunt knives found in almost all Italian restaurants. It is really an ordeal to cut apart the pizza slices with the blunt knife and in the process the pizza goes cold! This was an A+ from my side.
Coming to the food!
A plate of olives was placed on our table which was a total let down, considering the size and quality of olives. It could have been much better for the place we were dining at. 
We did not get the draught beer when we visited and were told they were out of stock. There was no good mocktail on the menu too.
We were hungry so we quickly ordered for a salad so that we can take time to decide for the main course.We ordered for  ‘Insalata di mozzarella gratinata’. This consisted of mixed salad leaves, mozarella, sweet corn, pine nuts, tomatoes and olives.
The portion size was very liberal and enough to stuff two of us.
The most striking part of the salad was caramel coated tomatoes. The tomatoes were ripe, juicy and firm and cut into two halves. Each half was covered with caramel which I discovered only when the caramel fell apart while cutting through the tomato.

 I was wowed by the innovation. The next good thing about the salad was the four thick slices of herb clad mozzarella. They were well seasoned and very filly.
In the mean time, we had ordered for focaccia too, which we later realized was our mistake.
We were served four pieces of the bread, two each of olive and onion garlic. They were nice but we were already full.
Damn! We had shortlisted a pizza to be ordered but we were stuffed! We changed our mind and settled for the dessert instead.
They have a very extensive dessert menu. I was happy because there were quite a number of eggless variants. We opted for coconut ice cream in pineapple soup.
We didn’t have to wait for the dessert to arrive. The presentation was sad and dull, the soup spilled over the fringe of the plate, however all this can be easily forgotten once you dunk your spoon into the dessert. 

coconut icecream in Bangkok
Heaven! The flavours were so nicely balanced and the combination was superb! This is the second best coconut ice cream I have had so far.
(PS: The best coconut ice cream was at a roadside stall in Chatuchak market in Bangkok.)


Overall the experience was good, the dessert and the candied tomatoes made my day and I would go again with a bigger group of people so that we can do justice to the food.


Friday, May 10, 2013

Gadhwali raita

Ingredients:


1. Cucumber          2no.
2. Green chilli         2no.
3. Curd                  500gms
4. Mustard Seeds:  1/2t
5.Salt                      To taste
6  Turmeric           a pinch
7 Cumin Powder    1/2t


Method:

1. Peel and grate the cucumber.
2 Squeeze the water. (You can drink this water, its refreshing!)
3 Grind mustard seeds, salt ,turmeric, green chilies and cumin powder into a paste in a pestle and mortar adding few drops of water gradually.


4 Whisk curd to a smooth consistency.
5 Add cucumber and the above paste to the whisked curd.


6 Refrigerate for 2-3 hours for the mustard to develop full flavour and pungency.
7 Serve chilled.