About Me

My photo
A food technologist by education, techno- commercial by profession and a foody at heart. Discovering and appreciating good food is my habit and experimenting with various flavors, and cooking techniques my passion! Food styling is my hobby and eating a favourite! Why this blog name? Because I always look for the green dot, because I am a vegetarian - no egg,no gelatin! I believe that you can find good food anywhere, sometimes at the places you least expect!I also believe that food is meant to be shared and its okay when you offer somebody your favourite food and secretly wish that he refuses so that you can have it all by yourself!Good food is omnipresent! You need to have the nose for it :)

Translate

Monday, July 29, 2013

Blueberry duffins

Blueberry duffins! 
Yep it's a blueberry muffin in the shape of doughnut 
Ingredients :
Maida : 1 cup
Baking soda: 1/2 t
Baking powder : 1 t
Milkmaid 1/3tin
Blueberry sauce: 3T
Butter: 50g
Method:
Blueberry sauce : Mix one cup frozen blueberries with 1/2 cup sugar and crush in a processor carefully so as not to purée it fully. Let it stay chunky.Heat in a heavy bottom pan with one cup water till it reaches a syrupy consistency.Let it cool.
Duffin:
1. Sift maida, baking powder and baking soda thrice 
2. Melt butter, add 50 ml water, milkmaid and blueberry sauce
3 Fold in the dry ingredients
4 Transfer to pre greased doughnut shaped muffin tins.
5 Bake in a preheated oven for 20 minutes
6 Serve warm with blueberry sauce on the side
Posted by Picasa

Tier cake - for hubbies buddies reunion!

My husband Mudit was very excited and was looking forward to meet his school buddies after almost 17 long years.The reunion had its own charm, it was like a time machine to their childhood days, and they sat there all afternoon reminiscing the good old days. Although many of them were in touch with each other , but meeting all of them together, with their respective families was captivating.
Over the past couple of weeks I discovered a new person in my spouse- he was bursting full of energy- at home, at work and elsewhere.I could see a child like enthusiasm in his eyes and cheer filled in his voice. He had the vigor of  a five year old who is too excited to bring his new friends home to meet his parents and to tell the world that he has the best bunch of buddies! (He indeed is blessed to have such a wonderful group of friends!) I decided to be a part of his enthusiasm and contribute my own little bit by baking a cake :)
We were expecting a gathering of around 30 adults and 12 kids. Tier cake was the only solution to feed around 40 people. I started with 2 basic sponge cakes and what happened next is below!


Ingredients:

For 2 pound chocolate sponge

Milkmaid: 1cup
Maida    : 1cup
Cocoa Powder: 1/4 cup
Baking soda :1/2t
Baking Powder :1t
Drinking Soda : 1/2 cup
Vanilla Essence : 1t
Sugar : 2 T
Oil : 1/2 cup

For 1 pound chocolate sponge


Milkmaid: 1/2cup
Maida    : 1/2cup
Cocoa Powder: 1/8 cup
Baking soda :1/4t
Baking Powder :1/2t
Drinking Soda : 1/4cup
Vanilla Essence : 1/2t
Sugar : 1 T
Oil : 1/4cup

Whipping cream : 2cups
Natural food colours: Few drops

Method:

1. Whisk milkmaid with an electric whisker for 5 minutes at constant high speed  
2. Slowly add oil and keep whisking
3. Sift together baking powder, sugar, maida, baking soda and cocoa powder.
4. Alternatively add drinking soda and flour mix, with continuous whisking.
5. Add vanilla essence.
6. Pour in a greased cake tin and bake in a preheated oven at 180 degrees for 30 minutes or until a skewer comes out clean


7. Demould and let it cool on a wire rack.
8.Make both the sponges with same process.
9. Refrigerate overnight or for few hours.
10. Slice the cake horizontally in two slices and even out all humps and crumbs with the help of a sharp knife.
11. Place the first slice of cake on a turn table.
12. Whip the cream until stiff peaks are formed.

13. Put a dollop on the cake slice and even out with the help of an icing knife.
14. Sandwich it with the other slice of cake and cover all sides with whip cream.
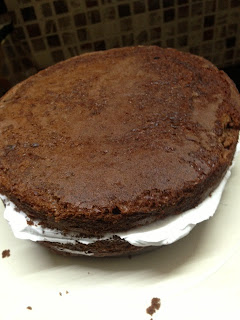
15. Repeat the same with the smaller sponge too.
16. Insert 3 toothpicks carefully in the bigger sponge and secure the second cake over it.
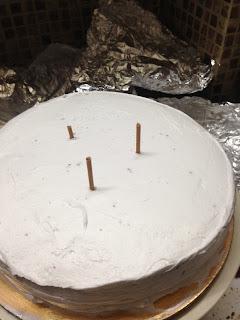
17. Divide the whipped cream in 3 parts and add different colours to each of them.
18. Fill up some cream in the piping bag and using the tip 7, nicely cover the entire cake..
19. Refrigerate the cake.

Wednesday, July 24, 2013

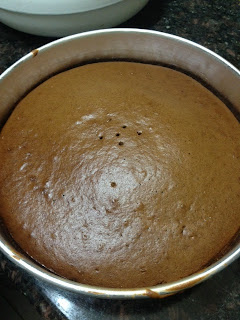
Our Anniversary cake!

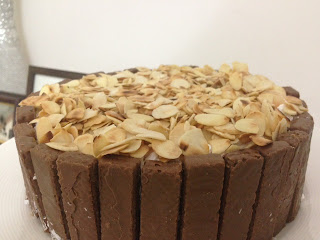
It was our 6th Wedding anniversary and I was itching to bake a cake. All these years I had been thinking of baking one, but was too fainthearted to take the 'risk' of a spoilt mood by a flop cake! This year I gird up my loins and ventured into cake making. I started  with basic eggless sponge cake and then let my creative juices flow.Originally the plan was to decorate the cake with glazed exotic berries, I had even procured a tin of ' summer berries in light syrup' and thought of glazing and placing them on top of the cake. I pop opened the can and was shattered to see the faded, dull, limpy berries- brown raspberries, grey strawberries and ugly blueberries.It was then that I decided to decorate with roasted almond flakes. The results are in front of you!
Here's the recipe:

Ingredients:

Milkmaid: 1cup
Maida    : 1cup
Cocoa Powder: 1/4 cup
Baking soda :1/2t
Baking Powder :1t
Drinking Soda : 1/2 cup
Vanilla Essence : 1t
Sugar : 2 T
Oil : 1/2 cup

Whipping cream : 1cup
Almond flakes 100gms
Cooking chocolate : 200gms
Orange zest 1T
Wafers : 1 pack

Method:

1. Whisk milkmaid with an electric whisker for 5 minutes at constant high speed
2. Slowly add oil and keep whisking
3. Sift together baking powder, sugar, maida, baking soda and cocoa powder.
4. Alternatively add drinking soda and flour mix, with continuous whisking.
5. Add vanilla essence.
6. Pour in a greased cake tin and bake in a preheated oven at 180degrees for 30 minutes or until a skewer comes out clean
7. Demould and let it cool on a wire rack.
8. Refrigerate overnight or for few hours.
9. Slice the cake horizontally in two slices and even out all humps and crumbs with the help of a sharp knife.
10. Place the first slice of cake on a turn table.
11. Whip the cream until stiff peaks are formed.
12. Put a dollop on the cake slice and even out with the help of an icing knife.
13. Sandwich it with the other slice of cake and cover all sides with whip cream.
14. Fill up some cream in the piping bag and nicely cover the edges of the cake with vertical lines.
15. Refrigerate the cake.
16. In a double boiler, temper some chocolate and add the zest of orange.
17. Dip the wafers in the molten chocolate and place them on a parchment paper and refrigerate till the coating is hard.
18. Align the choco sticks on the edges of the cake.
19. Top the cake with roasted almond flakes.
20. Enjoy!


Saturday, July 20, 2013

Double Choco Chip Cookies.

"The mausam was  awesome and my oven was craving for some cookies.I had no option but to bake"..
Here's the recipe...


Ingredients

Maida : 1 cup
Baking powder : 1/2 t
Baking soda :1/4 t
Sugar: 4 T
Butter : 30gms
Choco chips : 2/3 cup
Milk : 2 T

Method:

1. Sift together maida, bpd, b soda


2. Cream together sugar and butter with a whisk.


3. Mix both things together and knead into a dough adding milk.


4. Add the choco chips


5. Portion the dough into 6 parts
6. Arrange and flatten on a lined baking tray.
7. Bake in a preheated oven at 180 degrees for 30 minutes or until they turn nice golden brown..

Friday, July 19, 2013

Vegan Fondant

Vegan Fondant


The main reason why most other home-made fondant recipes cannot be considered vegan is because they contain gelatin or marshmallows as thickeners. One vegan alternative is agar agar.

Ingredients

* 3/4 tsp agar agar powder
* 1/8 cup cold water
* 1/4 cup liquid glucose
* 1 tbsp vegetable shortening
* 1/2 tablespoon glycerin
* a little more than 2 cups icing
* 1 tsp vanilla extract or other flavoring

Directions

1. Start by sifting the icing sugar into a bowl through a large metal strainer. You can see how all the big lumps are broken up and the icing sugar is nice and airy. This will make kneading later on easier and you will avoid having icing sugar lumps in the fondant.
2 Mix the agar powder with water in a small saucepan and let it soak for a while. It will become of a thicker, gelatinous consistency. After about 10 minutes place the saucepan on the stove top on low heat. The goal is to dissolve the agar mixture. This has to be done slowly. (Otherwise the water will simply evaporate and agar speckles are left in the bottom of the pan.) Stir constantly and add more water by the tablespoon as needed so the mixture doesn't dry out.When you see that all the agar powder is dissolved (it will take probably around 10 minutes) take the pan from the heat.
3 Now, add the glucose/corn syrup and shortening. Stir the mixture until all of the shortening dissolves. Stir in glycerin and flavoring.
4.Put half of the sifted icing sugar into another bowl. Make a well and pour in the agar mixture. Stir together with a spatula as much as possible adding more icing sugar when needed. When you can't stir anymore start kneading in the icing sugar as needed by hand. 5 Form the fondant into a ball.
6. Portion into 4 parts and knead in the desired colours.
7. This fondant can be used in various ways to decorate.I had some muffins in hand, so practiced on that.

PS:Will upload step by step tutorial soon :)

Tuesday, July 16, 2013

Banana Walnut slice

Baking is now my latest obsession-it has started growing on me! You wont believe me if I tell you that I am literally thinking about baking 24X7.
This morning when my spouse caught me baking at the wee hours of morning, he was taken aback!
My urge to bake was simply irresistible and I started as early as 5 am!
I baked a banana walnut loaf today, very healthy, very yummy!
Here is the recipe:


This is how it looked, I didn't have a loaf tin so had to manage with a cake tin... 

I thought of clicking pics for every step but was too impatient!


INGREDIENTS:

1. Whole wheat flour : 1.5 cup
2. Ripe Bananas : 3
3. Milk: 1cup
4. Maple/ Golden syrup / honey :2T
5. Chopped walnuts : 1/2 cup
6. Refined oil : 1/2cup
7. Salt: 1/2t
8. Baking soda: 1t
9. Baking Powder : 2t
10. Omega Mix :1T

METHOD:

1. Mix all the dry ingredients (except the walnuts and omega mix )and sift through thrice.
2. Blend and whisk all wet ingredients.
3. Mix the two by cut and fold method, being careful of not over mixing.
4. Fold in the omega mix and chopped walnuts
5. Transfer to a greased mold and bake in a preheated oven for 30 minutes until a toothpick comes out  clean.
6. Demould. Let it cool on a wire rack and cut into thick slices. Serve hot or at room temperature.

PS: This has just the right amount of sweetness for adults. However,if serving to  kids , sandwich some nutella between the two slices.

Thursday, July 11, 2013

Tabbouleh

I have had very limited exposure to the Arabic cuisine. I somehow happened to taste this salad during my visit to Dubai; and today decided to replicate it in my kitchen! This is a very healthy and fresh salad and is predominated by fresh parsley notes. It can be heaped on a pita bread or can be served as a side and for small eaters, this can be a meal in itself.

                                                                                                  INGREDIENTS


  • Couscous : 1cup
  • Bell pepper( finely chopped): 1
  • Tomatoes (finely chopped) :2
  • Onion ( finely chopped) :1
  • Black olive (sliced) : 3T
  • Olive oil 2T
  • Lime juice 2T
  • Parsley (finely chopped): 2T
  • Mint leaves (finely chopped) : 1T
  • Salt : To taste
PROCEDURE

1 Bring 1 cup water to boil along with some salt and 1t salt
2 Remove from flame and sprinkle couscous, delicately stirring it.
3 Cover the lid and let it rest for 2-3 minutes
4 Fluff up with a fork and add chopped tomatoes,bell peppers, onions and olives.
5 In a bowl or dressing shaker, whisk the olive oil, lime jiuce, herbs and salt.
6 Mix the dressing into the salad.
7 Cover with lid and stotre in the refrigerator for couple of hours to help the flavours blend in.
8 Serve cold with warm pita bread.